Showing posts with label Cards. Show all posts

Monday, July 7, 2008

Just For Fun!


I hope everyone had a great holiday weekend! We were busy here! Of course, we had the usual 4th of July excitement on Friday; food, fun and fireworks! My husband and I also decided to make a quick trip to Eugene (3 hour drive each way) Friday morning (and make it back in time for 4th fun) to pick up some fun toys for the kids. We got them Baja Mini Bikes and they LOVE them! We decided to get three so there would be NO fighting, and I'm so glad we did it! They look a bit like clown motorcycles but they have really wide tires so there is no tipping, they also have a big banana seat and the kids can sit on them and still touch the ground. They have a small gas-powered motor and so far...no wrecks! I think it was a great investment...especially because it gets the kids outside and out of my hair! I'll try to get some pictures...especially some of my husband riding them! He really looks like a clown!

I called today's post "Just for Fun" because I actually got to make a card Just for Fun! I got a few new images in the mail last week from a very good friend (Thanks!!) and I couldn't wait to color them! They are the cutest frogs I think I've ever seen. What do you think?

The Card.
Isn't she darling? You can find her at DRS Designs. And guess what? She's got a mate! I wasn't able to finish a card with him, but he's colored and ready to go, so hopefully today I can finish something with him and show him later this week!
Be sure to check in tomorrow for Jacksonbelle Design Team Challenges....you don't want to miss Lynda's great sketch!

Thursday, May 8, 2008

A Little Lily for ya!


Okay....who doesn't love Lily? She is nearly the cutest little girl out there!
I got her about two weeks ago.....and I finally got to make a card with her!
(I have a swap coming up and I'm supposed to use a "never-been-used set"....so shhh... don't tell.....cuz I still might use her!)

Cute Little Lily.Little LilyProducts: Stickles.....Lots-a stickles! I used it on her flower, the big brad flower center, and on the patterned paper! I had FUN with it! Icon Bling from Me and My Big Ideas (found at Jacksonbelle Embellishments of course!). I colored little Ms. Lily with Prismacolor Pencils, and the sentiment is a rub-on!

Let's see, this week, I will spend 4 evenings at the baseball field and one evening out of town for Bunco (which by the way was quite fun and I really enjoyed NOT being at the baseball field!). Next week, I will spend 3 nights at softball (daughter) and 4 nights at baseball (son); I'm not quite sure how I will pull this off, as I only have 5 nights to do it!

Have a very happy Friday and an even happier weekend!

Friday, April 18, 2008

Inspired again.

This card is basically the same layout as the previous one. I used SU! Polka-Dot background with Choc. Chip on white. I really like the not-so-perfect image it makes..it is just enough to be noticed but it doesn't steal the whole show, if you know what I mean! The main image is from the same Inkadinkado set as before, and I managed to use two pieces of my SU! Hoardware! Yeah for me! I also used the Choc. Chip Twill from SU. I love the idea of this product, but I don't know if it is just me or if it is actually the twill, but it is not perfect. It seems to get thick and thin all through the whole roll and it drives me NUTS! Well I'm already half-way there so that isn't too hard to do, but if I want a long piece it looks crooked no matter what I do! I wonder if it is just my roll, me, or the product? Anyone have this problem? Oh, and when I cut my card or scored it (don't remember where it actually went wrong) the front was shorter than the back, so I found this scrap of matching paper (that was already scalloped punched from months ago) and used it! It was perfect and I was thrilled!

Thanks for stopping by! I'm headed to Eugene (the big city, which means Michaels and Target!!) with Mary this afternoon and I can hardly wait! The weather is supposed to be cruddy..but I'm hoping it won't be too bad....I wouldn't want any of my new scrapbooking paper to get wet on the way out!! : )


Thursday, April 17, 2008

Noteworthy Inspiration

I found this Making Memories Noteworthy notebook the other day at a little local art store and I fell in love! The pink scalloped page was my inspiration for this card. I was going to use the real thing, but I just couldn't make myself tear out the page just yet! It was also a little big for a standard card and I just couldn't bring myself to cut it! I will do it some day though! It comes with several of each style, so I also plan to use it on a scrapbook page or two as well! The background stamp is sadly a retired TAC stamp....I love it and I don't use it often enough! I think it is very fun! For the scalloped circle, I used the Marvey Giga scallop punch and the Mega Circle (I think those are the sizes..but I usually get them wrong), glued the layers together and then cut them in half! I used DaisyDs Stitches Rub-on (the kind in the cute mini applicator) to stitch it up. The main image is Inkadinkado, and it was a gift from a good friend (Thanks Heather!)....I LOVE IT! I glitterfied the butterflies and added Crystal Effects to the other little dots on there (they sort of look like butterfly eyes, you know, the fake ones on their wings to confuse predators? but I'm not sure why they would be floating around there...perhaps the fell off the wings) I decided to go with "Mother" on the card because I needed a Mother's Day card and it fits in the SU! Hodge-Podge Hoardware thingy!

Thanks for hanging out for a bit!

Wednesday, April 16, 2008

Look Ma! No Pink!


Yeah! I got to do another sketch challenge (Splitcoast Sketch Challent SC172)....and it is ON TIME! I don't know that I've ever made a card with these colors before...it feels very much like the 70s...avacado and and burnt orange, but it could totally be a boy card, which I'm not too good at! I have such a hard time NOT using Pink! I know I love the C.C. Designs Its My Birthday Set, and I LOVE-LOVE the rub-on stitches! I'm getting much better at applying them and I think I need to order more so save some for me!! I have never done the circles behind the brads, but I had to use my Big-Bite Cropodile to punch the holes and the holes were just a bit big and left the brads sliding a little bit, so I used the circles and I likie those too! I give this sketch an A+.


Monday, April 14, 2008

I'm Late!


No, I'm not preggers.... just late on posting a SCS sketch challenge! Sketch Challenge 171. I'm not too sure yet if it was the "offset" oval challenge or the fact that I was actually sort of busy that made me late on this sketch! I'm not even sure if this card even falls the rules of the challenge! When I thought of offset ovals, I just couldn't get the "outlines" of an oval out of my head, so no stamping here....I did use a rub-on though (love these guys) and they can be found here: Jacksonbelle Embellishments. Paper is Basic Grey and Chocolate Chip.

Saturday, April 12, 2008

Happy Saturday!

Today was a beautiful day! I believe it was at least 70 at my house....beautiful....a much needed dose of sun! I spent the morning at a track meet for my daughter and the afternoon cleaning the garage and getting a few other things done around the house.

Last night I finally got to stamp! I needed some young fun birthday cards and being in the mood for summer, I picked some fun papers and stamps. I also decided to give the newest release of Sheet Load of Cards a try! This was my first time using something like this and I think I like it! I kept everything very simple; perhaps next time I will add more embellishments and be a bit more creative. Some of them don't have any sentiments, but I still might add them later.

I think the Sheet Load is a great idea and I will definitely do it again, especially when I want to make a set of matching cards! I received my new set of C.C. Designs Its My Birthday this week and I was so excited to use it! This is my first C.C. Designs set and I'm in LOVE! I was soo impressed with the quality of the rubber and I LOVE the thin EZ mount! This is the coolest stuff! I think I want everything mounted on this stuff! The images stamp beautifully and I'm so impressed with the quality and you can't beat the price, and definitely not the shipping at All That Scraps! This monkey is probably the cutest one ever and it was so easy to color! I used a paper piercer to poke the holes for him to hold the birthday sign. I think this is a cat....not 100% sure, but whatever it is......it sure is cute! I glitterfied the presents and the cupcake because I'm not very good at detail coloring....and glitter covers up a lot of mistakes!

This cute little girl image is from The Angel Company Girlz & Boyz set. I think the kidz in this set are really cute and fun to color!
This cute little beach guy is a retired TAC stamp set. The DP is Doodlebug Sunny Doodles. (My friend Janette used Daisy Doodle and I thought it was super cute...so I found Sunny Doodles..it is just as cute!)
I hope you are enjoying your weekend! I know I am! Tonight I think I will get a few hours to play....and Basic Grey Sugared is calling my name! Thanks for taking the time to stop by!

Tuesday, April 1, 2008

The Real Deal!


Well here it is in full color, although the color isn't quite right! It is more in the pink family rather than the coral/orange...but you get the idea! I'm still loving this Inkadinkado stamp set (Patterned Bugs)! This image is ONE big stamp! I used the Cotton Candy Spectrum pad to stamp it; it is much easier than trying to create different colors with markers! The "happy Birthday" is PTI. The Flowers are Bazzill Wings Bitty Blossoms. I think they are the perfect size for card-making! I used a small circle punch to create the center of the flowers. I added a little glitter on a few of the butterflies too! The cardstock is SU Purely Pomegranate and Chocolate Chip.

Thanks for looking!

Monday, March 31, 2008

Bright Bugs Just for Heather!

You must by psycho, I mean psychic Heather! I was working on this post for tomorrow when you commented...but just for you...I will post early!


Bright colors are not in my comfort zone, I wanted to use my new stamp set Patterned Bugs by Inkadinkado. I've only tried a couple of brands of clear stamp companies and I'm always a little leery of trying a new one...well I was not disappointed with these! They stamp great and clean up is a cinch! And they are such a bargain! I haven't tried these with SU ink yet, but they work beautifully with Palette Hybrid inks. I only have a few colors and they are all bright....so that is why I stepped out of my comfort zone and went bright! I've had these Palette Spots for nearly two years and I've only used them a few times! What was I thinking? They are great little ink pads! I'm really practicing control by not running over to PTI to pick up their new colors! I'm normally a pink fan, but her greens/blues are delish, and all this talk about them really isn't helping my control much! So back to the card....it doesn't need much explaining! It was simple...only one layer, just stamped the bugs randomly, then put some of my favorite ribbon on there, and decided to use my new SU hardware! (I've been hoarding this for a while!). Sometimes I can spend an hour just coloring an image....and another hour trying to figure out a layout....this card came together fast, one layer, one stamp set, no coloring, bam! A cute bright card! I did cut the card a bit smaller than the usual A2 so that the ribbon could hang off and it would still fit in an envelope.

I played around a bit with my photoshop program and I thought this looked pretty cool..so I thought I'd share. This was not accomplished by any stamping technique! It was done in photoshop by giving it a "plasticwrap" effect! So here it is just for fun! I may have to try to figure out a way to do this though with some embossing stuff or something!


Thanks for checkin' me out today! I do love gettin' hit on!


An Udder Birthday?


When The Angel Company released this stamp set, I knew I needed it! I can't believe I waited a whole month to order it! The cow was really fun to color...I kep'r simple, and used prismacolor pencils. Well, I guess I kept the whole card simple! I've had the Catelynne FWIC paper pack for probably a year and I've just recently started using it! I LOVE IT; however, I wish there were more pieces of paper! Looks like I need to order another one! Thanks for stoppin' by!


Friday, March 28, 2008

Flower Collage Trio (okay four-o)

I was trying to think of a name for the post...and all I could think of was the name of the stamp set - clever eh? Then I thought...I'd never say "trio"....and there are four cards....I would say "four-o"! !

I'd like to say I came up with these purdy cards all by my lonesome....but I didn't....I half-copied them from my good'ol friend Heather! She sent me a card MONTHS ago that made me NEED this stamp set! Her card was beautiful! The stamp set is Flower Collage Trio from TAC. It is a set of three (hmm..trio?) and makes the card look like I did LOTS-A work! Sadly, the hardest part was the little tiny Mellow Moss layer underneath the collage image stamp! It is an odd size with no true measurement... actually the sad truth is that my little paper cutter that I can't live without doesn't have the best measurement marks and I have to guess-ta-measure all the time. (And YES.....It has cut me!)
This is actually my second one of these cutters....I nearly cried when #1 one fell on the floor and broke....and #2 cuts crooked (couldn't be my fault) but I still use it! We have a Love/Hate relationship!

So back to the card and the copying! Heather used SU! French Script on her background....so did I! Heather used Linen background or maybe Canvas.....So did I! Heather used some green paper.....So did I! Heather used LOTS MORE LAYERS...and Eyelets, and inked the edges and distressed it and glitterfied it......it was YUMMY! I used my Lazy-Bug (cuttlebug) and Nestabilities and whipped out my layers in just seconds....but then I spent WAY TOO LONG trying to get that Mellow Moss layer just right! I colored it up with some SU Watercolor Crayons (sadly these have been much neglected since experiencing Prismacolor pencils and markers). One has glitter and one has crystal effects, and then I remembered I was being lazy(I mean making quick cards), so the other two have nothing! Anyway....Heather's card was Awesome....Mine is half copied so I will call it half-ass good!

Thanks for taking the time to read all the way down to here!


Thursday, March 27, 2008

All Mixed Up Again!

I promise this one will be a quick post! I loved the sketch challenge from Wednesday so much that I decided to do it again! Check it out at Splitcoast Stampers! SC169

I used the same stamp set, All Mixed Up, and I’m wondering why they retired it! I think it is soo stinkin cute and I can’t believe I waited a full year to cut it! I used the same layout. The girl is really holding a heart, but I didn’t want her to, so I gave her a bouquet of flowers instead! I wanted her to be radiant, so I lit her up with yellow, then shaded around the yellow with a blue. I can't decide if I really like the effect, but I liked the card well enough to accept it! (I wasn't coloring it again!!)
Ballerina

Ballerina:
PTI White, DCWV blue CS, SU! Purely Pomegranate CS, all patterned paper is from TAC Catelynne Fly With it Paper Collection. Colored with prismacolor pencils and OMS. Flowers are Doodle Bug Cupcake Paper Posies.

The ugly duck below is really "All Mixed Up!" It was so much fun to color his slippers pink and to add the pink brads....way out of my norm....but I love how it turned out! I thought of my youngest son when I made this card! He's on the goofy side and likes to be different, but now that I say that...maybe I was thinking about my eldest....He really likes to stand out in a crowd! Hmm.. Perhaps I need to make another one!

One Ugly Duck!

One Ugly Duck:
PTI White, DCWV Blue/Yellow, patterned paper from retired TAC Designer Collection Country Cottage, Making Memories Polo Shimmer Brads (the pink ones to match the slippers!).

Thanks for stoppin' by!

Wednesday, March 26, 2008

Splitcoast Sketch Challenge

Warning: I thought this was going to be a quick post but apparently I had a bit more to say than I had originally planned!

Just a quick post to share my second EVER Splitcoast Stampers sketch challenge! SC169 I normally have such a hard time following a sketch that I never do them! This week was different….there was an additional challenge that actually helped me! The challenge was to make the final layer, #4, only 1-1/2 inches wide before any additional layers! Well this "narrowed" down my options to about 2 stamp sets! I stamped the main image (see hint below) and made sure I could cut it to 1-1/2 inches wide without cutting off any toes…or I guess I should say webs! Then I colored the image. I find that more often than not I color my images before I even pick out paper, cardstock or patterned paper, then I match the paper to the colored image. I found an old stack of Retro DCWV paper and thought that this brown/blue print looked actually pretty good even though the only blue in the colored image was some shading I did…..and then I went to town! I cut and measured and slapped it all together! I distressed the #1 paper, the Chocolate Chip…so much so that I was able to peal the edges apart. I think I like this technique! I sort of still feel like there is an empty spot, but I was hoping that some of the wrinkles would fill that up! Found some yellow brads that I would normally never use and thought it kind of pulled it all together quite nicely! Not my norm…..but I do like it!


Stamp set hint:
I have never used this stamp set before; I think I’ve had it for over a year - yikes - and never cut/mounted it! Usually I am sketch-challenged because I just don’t ever know where to start, what stamp set to use or what paper to use! So only being able to choose from two sets really made it much easier for me! Normally I’d use the Stamp-A-Ma-Jig (which I will call SAMJ) for a two-step stamp set like this, but since I hadn’t mounted it yet and I wanted to use it in a hurry (and I couldn’t find my clear piece for my SAMJ), I figured out a way to mount this set so that I will not need to use the SAMJ! Each little guy in this set comes in three pieces, head, body, and legs. When I mounted the head, I made sure that the neck was right at the bottom edge of the block as close as I could get it without hanging off, and I made sure I cut it really close too. Then the middle section doesn’t really matter, but I did decide to mount the upper portion of the body, the shoulders, towards the top of the block. The last section, the legs, I also mounted towards the top of the block, so that the ends that must meet up with the stomach are as close to the top of the block as possible. I stamped the mid-section first….this is very important! Then I stamped the head; I leaned my head down a bit so I could see just where I was placing the neck and lined it right up with the shoulders of the already-stamped mid-section! Then, and this is another important part, I rotated the stamped image 90 degrees, so the head/midsection were now upside down, then I took the lower section, the legs, turned that stamp upside down and lined up the top of the legs with the bottom of the mid-section and stamped. I got it perfect the first time….without the SAMJ! When I finally get around to mounting the rest of the set, I do plan on mounting it this way! I’m a bit bummed that this set retired! I think I’m going to love it….even though I am a year late!


I woke up this morning to icky thunder and lightening and the kids asking if they really had to rake the yard today! I said, “Why of course you do! Get out there with your metal rakes and get working!” Is Spring Break over yet?

Thanks for coming!

Tuesday, March 25, 2008

Here they are!

So here are the other two cards I said I'd post. Simple layouts, but cute enough, right? I used Out on a Limb again by PTI .... who knew a branch could be soo much fun and so versatile!?! Of course, I used my nestabilities and my Big Shot to make these quick and easy cards!


I used Ellison Texture Plates for the embossing of the background here and my white prismacolor colored pencil to highlight a few of the embossed parts. Woo! I changed it up a bit and added an extra branch! : )


And here I used Stampin Up! photo corner punch. I wanted to take a close-up picture to show you the layers. I really used 3 punched pieces, two Chocolate Chip and one Certainly Celery (although it looks a bit more Wasabi in this picture!) Anyway, I glued them just a bit staggered to show a tiny bit of the green and I love the effect I got with it. I messed up on this card and didn't get a good cut with my nestabilities....apparently I didn't line it up right, anyway, that is why the sentiment is in sort of a weird place! I had to cover up my mistake! As you can see, I didn't do a close up of that part!


So there you go! The other two cards! Wowser! : ) I think I might get a few minutes before bed tonight to try to make a few more birthday cards! Thanks for looking!


Saturday, March 22, 2008

Happy Easter!

Hopefully the weather is holding up for the egg hunts! I'm in Eugene at my sisters...poor thing! She has a HOUSE FULL! Anyway, I made these Saturday morning before I left and wanted to share them with you! I've had my Out On a Limb set for a few weeks now and this was the first time that I got to use it! I can't believe I waited so long! The cardstock looks black, but really it is the darkest brown out of Bazzill Basics Monochromatic paper! I also used Certainly Celery and Purely Pomegranite. The sentiment was stamped on clear acetate with white Stazon. I wanted the words to show up bright and clear, and you don't always get that with textured paper, and especially not on dark paper, so this is what I came up with. I used the Cotton Candy (I think that is what it is called) Kaleidacolor specrum stamp pad.... it love the effect it gives the blossoms! I used Silver Liquid Pearls for the centers of the flowers. Here I used the clear acetate again....I think I'm going to be using this a lot!! I love how perfectly "clear" the sentiment shows up! Chocolate Chip, Pretty in Pink, and Certainly Celery were the colors used here, a bit of a softer look than above! I wanted to do something a little different than my usual one strip of paper or ribbon, so I cut the paper to look like ribbon! Tricky Kisa! You can't see it, but the center of the dots are dotted with Crystal Effects, it gives it a bit of dimension. I used Nichole Heady's trick on the one corner being rounded and I LOVE it! These layouts were simple and quick.... I plan to try to remember them and use them for some quick cute cards!

I plan to be home Monday and I have two more cards to share that I made Saturday morning...these two were my fav. but the other two are cute enough to share!


Friday, March 21, 2008

Easter Cont'd

Okay! Here are the other Easter Cards that I promised ya! As you can see by these cards, once I get a sketch that I like…..I like to recreate it until I’m sick of it! I am not very good at sitting down and making 10 different cards but I am pretty good at making 10 of one sketch with a few tweaks! I just LOVED these colors. I used to think I was not a fan of yellow or orange, but SU! has introduced me to some great yellows and oranges and I find myself reaching for them more often now! I even painted my bathroom something similar to Barely Banana and So Safron…with a touch of Apricot Appeal! I had pieces of the cardstock stuck on the wall for weeks so I could see which I liked best, then I picked one and went to town painting it and I LOVE it! Okay, back to those cards!

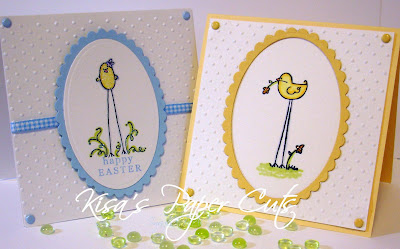
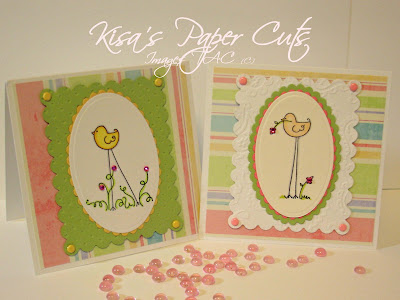
First off, I have to tell you about the stamp set I used for this one! Sweet Tweets (not to be confused with Sweet Teats, which I’ve caught myself saying many times on accident), it is a retired set from TAC and I think these chicks are just so cute! I love their long legs and the simplicity of each image! All of the following cards are basically the same layout on a 4-1/4 square card. On the first two cards, I used PTI Stamper’s Select White Cardstock. After using this paper, I won’t settle for any other white cardstock as a base of a card! Cuttlebug and Nestabilities make it this sketch so easy! I used the Swiss Dot and Petite Ovals. It goes together easy-peasy! I colored the images with Prismacolor Double-ended Art Markers. I almost forgot to mention that I did sneak PTI Limitless Labels in there for the “Happy Easter!” I only used the sentiment on one card because I wanted these to also be good for spring cards, baby cards, or any-occasion cards.


On the next two cards, I used the Spring DCWV stack from last year, Nestabilities scalloped rectangles and ovals, and the Cuttlebug embossing folders. I apparently didn’t use Swiss Dot for every card! The one on the left is Swiss Dot just turned with the dots facing down and the “holes” facing up. I liked how it gave a softer look. The one on the right, however, was created with the Paisley embossing folder! These are still basically the same layout as above, just one more added layer….still easy-peasy! I also added a little pink bling for flowers!


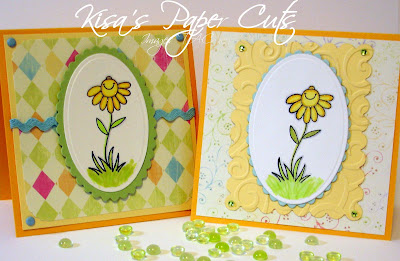
And the final two cards, well they are just the same, no surprise, but I did use a different stamp set, oh! And it looks like I used a different embossing folder!! This stamp set is called “Be Curious” and it is also a retired TAC set! Unfortunately, they retired a lot of good ones! These flowers are just so cute to me and make me smile! Just in case you are wondering, I use a Big Shot to do my die cutting and embossing. I have been very satisfied with it for over a year. It is compatible with just about everything out there, and I think I get a great result!


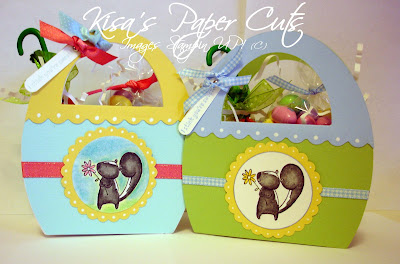
Okay, one last thing! For an added bonus, I thought you might like to see my stinkin Easter baskets!

I had some white treat boxes that I cut the handles off of, I used my Creative Memories custom cutting system, ovals, to create the "egg", and to cut the handle out, and then I glued it to the box. I added a bit of embellishments and layers and this is what I got! I have seen some other baskets like this before at Splitcoast Stampers, but I do not know the original gallery or creator. Stampin UP! Pun Fun is the stamp set that I used. This set is a bit on the pricey side, but so far, I've used it to make plenty of Easter stuff, and a Birthday card for my sister. I mounted the set "unconventionally" by cutting of the phrases and mounting those on the side of the block that way I don't have to use the words if I choose not to, or worry about masking them off.


Thanks for checking out my stuff! Hopefully I will get a chance to create something new this weekend to share with you!

Wednesday, March 19, 2008

An Easy Easter Card

Well, I can’t believe that Easter is already this weekend! I just feel like it is weeks early this year! I did make some cards for the holiday and thought that I’d share them with you. It might take me a few days to get them up here, so I'd better get started! Not that there are a lot of cards...it just takes me a lot of time to figure out how to get them on here!

This first card is one of my favorite ones! I was looking at Susie B's gallery and just fell in love with her cards…who wouldn’t?!? She uses the Cuttlebug in ways I could only dream of! She has a blog too with lots of tutorials! So be sure to check that out! Anyway, I got the idea for this card from her gallery and LOVE how it turned out! Swiss Dot just screams “Easter” to me! I think I used it on EVERY single Easter card I made!

I used Stampin UP! Sky Blue for the main card, then PTI white (if you haven't tried this....you really need to - it ROCKS!) for the card front. The paper is from a DCWV Spring Stack from last year. I used my CB embossing folder, Swiss Dot, and my BELOVED Scor-Pal for the score lines. I LOVE this look - it just seems so clean! Of course, I also used scalloped oval nestabilities....I have the petite ones, but I'm not sure if I used the large or small for this one...sorry about that! And those cute little baubles!?! Those were shared/gifted to me by Heather! Heather -You Rock..or maybe I should say, You Bauble!! I haven't been brave enough to put them on a card yet....but I LOVE them in pictures! Oh and I almost forgot the MOST important part! I almost forgot that I stamped on this card! The stamp "happy Easter" is from the set called Limitless Labels from Paper Trey Ink. This set was a birthday gift from my friend Mary - Thank you Mary, I LOVE this set! I've used it for so many different occasions! So all-in-all, I think this is a pretty cute card for NO coloring and no ribbons.

Phew! Who knew I could write so much about one card!?! Well, if you do know me then you know I can talk a lot.....and I can type really fast....so that combined might be dangerous! I will try to get a couple more Easter cards posted before Easter! Oh, and don't mind my watermark! I haven't figured that out yet either!

LinkWithin

Blog Widget by LinkWithin