Showing posts with label TAC. Show all posts

Thursday, September 25, 2008

Bats, bats, and more bats!

Bats! I just can't seem to get enough of them! Okay - I think I'd pass out though if I came close to a real one, but paper ones....cute cute!

I started out with a piece of shimmery white paper, stamped the image (The Angel Company), colored it, masked it and then sponged and sponged and sponged! I used blues and purples and black! I layered the sponged piece on a piece of Eggplant paper, then onto a black card. I stamped some more bats, colored and cut them out, and then layered them so they look like they are flying off the paper! I also realize that those are fangs and NOT feet, but I accidentally cut them off and I was too tired stamp, color and cut again....so the fangs sort of look like feet!

For some extra shine, I used Sunflower Shimmerz on the moon, and I also used my white gel pen to give the spots just a bit more dimension. Now that I think about it, the bats would probably be very cute with some Crystal Effects as well.....I may add that later! I wanted to keep the card simple, so I used just one piece of ribbon (A Muse - from Heather! thanks Heather!) Then I used PTI's Happy Halloween stamp, punched it with SU! oval, then punched it again with the Word Window Punch, added some brads and called it Henry! I mean good! : )

Monday, June 30, 2008

Rub-Ons!

Okay, this is going to be a quick post! I've got loads of work to be done and not enough time!

The card.

I LOVE the Chloe Marie Rub-Ons....they are awesome. They are black and white....I love that! They show up really well, they rub on nice and smooth, and they even take on a bit of ink for distressing or making them blend in better! For the background of the card I stamped a TAC flourishy stamp then highlighted it a bit with my white prismacolor pencil (I LOVE this look!) I had some huge prima flowers and decided the rub-on would fit nicely right on the flower (I stole this technique from Beth..thanks!) The flowers are actually yellow..I just distressed them a bit with orange and brown and pomegranate to make them match! I used two flowers, and I trimmed the one with the rub-on. I also put a rub-on on the brad for the center! The patterned paper is from Prima Urban Cosmos and I used a Crate Transfers rub-on for the sentiment....it sort of got lost on the card, but oh well!

Thanks for looking! Check back tomorrow for Jacksonbelle Tuesday Challenge card....It's a color challenge!

Friday, May 2, 2008

A crooked day, I think.


First of all, I have to say this:
May Day! May Day!...Oh, I mean April Day, April Day! (I was so sad to realize that I had forgotten to say that on Wednesday...I love saying it. LaunchPad-McQuack used to say it when he was crashing on Duck Tails - My most fav. cartoon as a kid...well as a high-schooler too!)

Okay, back to the good stuff!!

It is 2:30 a.m. and I’m finally getting ready for bed. I thought I’d post real quick so you could have something to look at with your morning coffee cuz I’m pretty sure I’m going to still be snoring!

I want to thank Lindsey again at Jacksonbelle Embellishments for the great opportunity to ‘serve’ her! All I can say is that I am THRILLED and I look forward to many months of fun with the design team!


Not a quick card.

Sugared Bird
Thursday was such a distracting day for me! I had plenty of real work to be done…..but I just couldn’t sit long enough to do it! I left the sewing machine out the other day and I could hear it calling me name all day today. Finally, I succumbed to the voices! I thought I was going to just sneak and make a really quick card, so I pulled out my scraps from my 6x6 Sugared Basic Grey paper pack. I was thinking about doing some sort of “paper quilting” but this is what I came up with. I don’t think it is really quilting….but it is paper! I took my scraps and inked the edges a bit with my most fav. brown ink in the whole world, Versamagic Jumbo Java. If you have never tried this stuff, especially the brown…well you are missing out! It is DELISH! I'm pretty sure I might have even tried licking it before cuz it looks so yummy! It has a creamy sort of chalky finish that is delightful to the eyes (and I don't recommend licking it or eating it cuz it really isn't as good as it looks). I especially love it for distressing. What I love the most is that it does not “soak” into the paper like other inks do, GWIM? Then I stitched inside the first layer of Basic Grey paper and I added the pink circle (which was already cut…so that part was quick), but then crazy me decided I needed to sew a zig-zag stitch around the circle….oh how great it will look! Okay, yes, it will look great….but it was NOT FUN TO DO! Once I put the pressure foot down and began to turn the wheel to get the needle in the paper….I realized I was making a big mistake! First, I can’t sew a straight line worth C$#!… Do you think I can sew a straight-curved- line? Heck no! So I think I spent 15 minutes hand-cranking that wheel and turning the paper the whole way around that circle! Yes, I am happy with the final outcome, and there was only one stitch that wasn’t perfect, but I had major carpal tunnel by the time I was done! (note to self….do not attempt to sew a circle…especially not while trying to hurry and sneak a quick card - not gonna happen!)

My next mistake was that I had not planned on what I was going to stamp or where I was going to stamp, that came to me after I had it all sewed down. I decided to go with the bird from Inkadinkado's Bird Assortment (I was going to give you a direct link...but I see Jacksonbelle is out - gasp!..keep checking...maybe she will order more!)
I wanted it stamped on the pink circle, and I had one chance to get it right! Luckily that part worked out for me…the mistake was that I decided I needed to color it and it picked up the edge of the layer below so it looks like the bird has a funky neck! I also only had one chance to stamp the sentiment. I thought for sure I’d mess that one up, but it all worked out! So my card was almost done. I did my final sewing around the outside edge of both BG Sugared papers..don’t look too close cuz I really did a bad job here! I had to use some brads in the corners to help “distract” the eye from my really bad corners! And then the ribbon…You’d think that a nice big bow would take maybe 3 minutes…nope….more like 30. It was too big, it was too bulky, I cut the ends to short, etc. Everything went wrong! Finally, I ended up actually punching two holes in the card front (the holes are behind the bow), ran the ribbon through it, then glued the “faux bow” onto the piece of cardstock right between the two holes, like this
----*==*--- (- is the ribbon, * is the hole, == is the where I glued the bow). After all that work…the quick card was finished…and after all that work…the quick card took me 2 hours.

A Crooked Cat.

Crooked Cat
This was another card I had to try to sneak in tonight. It was a disaster from the beginning. No matter what I cut or rubbed on…it was crooked - EVERY SINGLE THING ON THE CARD. I stamped him crooked, I cut him crooked, the Basic Grey Sugared piece was crooked, the DaisyDs rub-on tape was crooked, the Crate Sentiment “hello…” was crooked, I trimmed the photo corners crooked, EVEN my scoring on the scor-pal was crooked (probably because the card I cut was crooked) and then I mounted the whole dang thing crooked. And if all that crookedness wasn’t bad enough…when I went to cut my scalloped rectangle, I cut it the wrong size! Arg! I don’t know was going on…but after I glued it all together (crooked)…I decided I’d probably better just get to work.

It is now 3 a.m., the internet is down, looks like I will be drinking coffee with you in the morning!

Later babes!

Addendum: The internet is back up...it is now 3:30 a.m...and I won't be enjoying a-cup'a with you as I will be snoring!

Tuesday, April 29, 2008

Mojo Monday #35 Sketch

Here it is....an on-time Mojo Monday sketch card!
About the card: This was a tough sketch for me - way out of my comfort zone! I just received a few new Bellas yesterday so I knew I needed to play with those, but I wasn't too sure how they'd work with the sketch. I may have gone a little overboard with the brads, but I liked that it gave a funky studded-girl feel to go with the TAC Uptown Girl paper. I tried to stay as close to the sketch as possible, and to achieve the "XXXX" part, I used DaisyDs rub-on tape, zigzag. To get the cross-stitch look, I just ran it twice making sure that the second application lined up in-between the first one.

Wednesday, April 23, 2008

SCS Sketch Challenge 173

Ahh! Finally I got to stamp a bit today! I’m not feeling 100% better, but I am definitely better. Sadly, my son, Andrew, is sick again (just got over a bout of pneumonia a week or so ago) so I will have to take him back to the doctor….again - poor guy. Today he said, “I think I’ve missed more days of school this six-weeks than I’ve been to school.” Not quite, but it sure is a good thing that he is very self-motivated or he would have a heck of a time staying caught up.

SC173/CC163
So, about that card! I was thrilled to get the chance to do another sketch challenge. I used to shy away from sketches, but lately they have been quite fun! Today’s sketch challenge is from Splitcoast Stampers, SC173, and I even did the color challenge (CC163), which really wasn’t a challenge for me, as I use this combo often, Chocolate Chip, Certainly Celery, and Pretty in Pink, in fact, I think I used these colors to make these cards!

I decided that with all of the layers, the main image needed to be something simple and cute, of course...so I went with my new mini stamp set from TAC, A Little Spring. I “glitterfied” the tree and curled the scrappers floss (love this look but it doesn’t last forever L). I cuttlebugged the shimmery white background piece, I ran it across my Chocolate Chip ink pad to make the swiss dots stand out a bit more. I thought it needed something a bit more…so I put some matching brads in the corners (these are the only SU! colored brads that I have and lucky me…they matched!) Hmm.. I think I must like these colors!
Well, enjoy….and thanks for stamping-by!

Hmm.. now that I look at the picture, I think probably had I had some Choc. Chip brads, I would have put them on the corners of the main image...(note to self...look for brown brads to buy...where in the heck do you buy those...and does SU! sell them? if not, why the heck not???)

Also try to find something else to make my pictures look purdy...people might be getting sick of the baubles..but I like the baubles...hmm


Thursday, April 17, 2008

Noteworthy Inspiration

I found this Making Memories Noteworthy notebook the other day at a little local art store and I fell in love! The pink scalloped page was my inspiration for this card. I was going to use the real thing, but I just couldn't make myself tear out the page just yet! It was also a little big for a standard card and I just couldn't bring myself to cut it! I will do it some day though! It comes with several of each style, so I also plan to use it on a scrapbook page or two as well! The background stamp is sadly a retired TAC stamp....I love it and I don't use it often enough! I think it is very fun! For the scalloped circle, I used the Marvey Giga scallop punch and the Mega Circle (I think those are the sizes..but I usually get them wrong), glued the layers together and then cut them in half! I used DaisyDs Stitches Rub-on (the kind in the cute mini applicator) to stitch it up. The main image is Inkadinkado, and it was a gift from a good friend (Thanks Heather!)....I LOVE IT! I glitterfied the butterflies and added Crystal Effects to the other little dots on there (they sort of look like butterfly eyes, you know, the fake ones on their wings to confuse predators? but I'm not sure why they would be floating around there...perhaps the fell off the wings) I decided to go with "Mother" on the card because I needed a Mother's Day card and it fits in the SU! Hodge-Podge Hoardware thingy!

Thanks for hanging out for a bit!

Saturday, April 12, 2008

Happy Saturday!

Today was a beautiful day! I believe it was at least 70 at my house....beautiful....a much needed dose of sun! I spent the morning at a track meet for my daughter and the afternoon cleaning the garage and getting a few other things done around the house.

Last night I finally got to stamp! I needed some young fun birthday cards and being in the mood for summer, I picked some fun papers and stamps. I also decided to give the newest release of Sheet Load of Cards a try! This was my first time using something like this and I think I like it! I kept everything very simple; perhaps next time I will add more embellishments and be a bit more creative. Some of them don't have any sentiments, but I still might add them later.

I think the Sheet Load is a great idea and I will definitely do it again, especially when I want to make a set of matching cards! I received my new set of C.C. Designs Its My Birthday this week and I was so excited to use it! This is my first C.C. Designs set and I'm in LOVE! I was soo impressed with the quality of the rubber and I LOVE the thin EZ mount! This is the coolest stuff! I think I want everything mounted on this stuff! The images stamp beautifully and I'm so impressed with the quality and you can't beat the price, and definitely not the shipping at All That Scraps! This monkey is probably the cutest one ever and it was so easy to color! I used a paper piercer to poke the holes for him to hold the birthday sign. I think this is a cat....not 100% sure, but whatever it is......it sure is cute! I glitterfied the presents and the cupcake because I'm not very good at detail coloring....and glitter covers up a lot of mistakes!

This cute little girl image is from The Angel Company Girlz & Boyz set. I think the kidz in this set are really cute and fun to color!
This cute little beach guy is a retired TAC stamp set. The DP is Doodlebug Sunny Doodles. (My friend Janette used Daisy Doodle and I thought it was super cute...so I found Sunny Doodles..it is just as cute!)
I hope you are enjoying your weekend! I know I am! Tonight I think I will get a few hours to play....and Basic Grey Sugared is calling my name! Thanks for taking the time to stop by!

Wednesday, April 9, 2008

Salsa Flower (TAC)


Here is the second post, as I promised! I just wanted to share what I made real quick with my scraps left over from my earlier cased card! I used Salsa Flowers (TAC) for the main image. I love this flower and it is easy to cut out! I used the paper tole technique, which basically means I stamped it and colored it, then stamped another, colored it, cut it out, and stuck it on the first one with dimensionals! I added a bit of bling....and there-ya-be! An easy card! I did also use the Scor-Pal to emboss a bit...I'm new to using the Scor-Pal for more than just scoring, but I do like the result! Thanks for coming back!


Wednesday, April 2, 2008

Another Sketch Challenge


I decided to jump in and do another sketch challenge! Wow! Two weeks in a row! (Obviously work has been slow lately..and sadly..it will be picking back up with spring break over so who knows when I will get stamping time). So back to the card! I'm quite proud of this one! I actually got two SCS challenges accomplished in this card, the sketch challenge and the technique (nectique) challenge! Sketch Challenge 170


The Technique Challenge 162 (paper tole) could have been easy, but I guess I hadn't put much thought into it before I started! I was only planning on doing the sketch challenge and I really wanted to use the Genevieve FWIC paper. If you can believe it, I've been hoarding that stuff for a whole year. It is BEAUTIFUL! I don't know why I didn't use it sooner! I also must admit that the stamp set, Friends Are Like Flowers (SU), I have been hoarding as well since before it retired a year ago! The sketch challenge had another narrow restriction, no measurement restriction, but still a narrow piece, and I was going through my stamps to find one that I thought would work; I came across this one and thought it would be perfect with my paper! So I cut and mounted my stamp, found matching cardstock and started assembling the card. I thought....hmm....maybe I could get two challenges out of this card, so I went to cutting out the flowers for the layering.

These were NOT good flowers to be cutting out like this! The one pink one - it seemed to work well; I actually got three layers out of it, the first one, the flower, and then the leaves. The second flower I did was the blue one....it was okay to cut out, but I would not want to do more than one (and I didn't!), but then I got to the purple one. When I was coloring it, I couldn't even decide if it were a flower, leaves or a doodle....so I made it a flower. Well there was NO WAY I was going to be able to cut that flower out, so I went with a few petals. I decided to cover up the "not so perfect" parts with some Icon bling, and that worked! AND then I read about the challenge and it said "NO FLOWERS!" Bummer, I thought, go-figure....after all that work!...but, I'm actually very happy with the card! It is bright; something somewhat new to me...and I'm really enjoying it! Thanks for stopping by!


P.S. I see I've reached 1000 hits! I guess I'd better get shopping for some candy! Check back to see what I find!


Monday, March 31, 2008

An Udder Birthday?


When The Angel Company released this stamp set, I knew I needed it! I can't believe I waited a whole month to order it! The cow was really fun to color...I kep'r simple, and used prismacolor pencils. Well, I guess I kept the whole card simple! I've had the Catelynne FWIC paper pack for probably a year and I've just recently started using it! I LOVE IT; however, I wish there were more pieces of paper! Looks like I need to order another one! Thanks for stoppin' by!


Sunday, March 30, 2008

Bind-It-All Project


I found this terrific "Meander Book" on Splitcoast Stampers. Beate created a great tutorial. I did have a hard time figuring out which was was the right way once I folded up the inside pages, but otherwise, the Bind-It-All made it really easy! I must admit that I am a little disappointed on the thickness that the BIA can handle...I don't even think it is 1/4 inch thick, so there are limitations on what kind of paper you can use for this project; SU designer paper was almost too thick; otherwise, I think I'm going to like having it around (even if I have to share!) I printed my pictures 2x2 and matted them with a 2-1/4 square. Next time, I plan to use a smaller circle punch to create the pocket tops/openings; I felt that these were just a bit too big for this little book! I'm so proud I actually put the pictures in and finished it!

I hope you are all enjoying your weekend, and thanks for visiting!


Edited: I wanted to add this picture to show that you can use regular cardstock (I used DCWV 12x12) with this project and still use the BIA! The Meander Book opens on the back side a bit, and you can punch it in three sections! Yahoo! I'm thrilled for this discovery! Now I can make the book with lots of good stuff!

Friday, March 28, 2008

Flower Collage Trio (okay four-o)

I was trying to think of a name for the post...and all I could think of was the name of the stamp set - clever eh? Then I thought...I'd never say "trio"....and there are four cards....I would say "four-o"! !

I'd like to say I came up with these purdy cards all by my lonesome....but I didn't....I half-copied them from my good'ol friend 
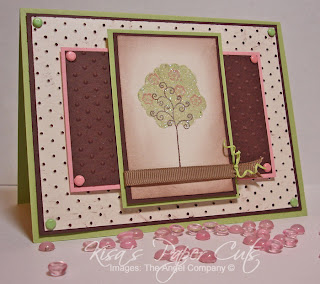
Heather! She sent me a card MONTHS ago that made me NEED this stamp set! Her card was beautiful! The stamp set is Flower Collage Trio from TAC. It is a set of three (hmm..trio?) and makes the card look like I did LOTS-A work! Sadly, the hardest part was the little tiny Mellow Moss layer underneath the collage image stamp! It is an odd size with no true measurement... actually the sad truth is that my little paper cutter that I can't live without doesn't have the best measurement marks and I have to guess-ta-measure all the time. (And YES.....It has cut me!)
This is actually my second one of these cutters....I nearly cried when #1 one fell on the floor and broke....and #2 cuts crooked (couldn't be my fault) but I still use it! We have a Love/Hate relationship!

So back to the card and the copying! Heather used SU! French Script on her background....so did I! Heather used Linen background or maybe Canvas.....So did I! Heather used some green paper.....So did I! Heather used LOTS MORE LAYERS...and Eyelets, and inked the edges and distressed it and glitterfied it......it was YUMMY! I used my Lazy-Bug (cuttlebug) and Nestabilities and whipped out my layers in just seconds....but then I spent WAY TOO LONG trying to get that Mellow Moss layer just right! I colored it up with some SU Watercolor Crayons (sadly these have been much neglected since experiencing Prismacolor pencils and markers). One has glitter and one has crystal effects, and then I remembered I was being lazy(I mean making quick cards), so the other two have nothing! Anyway....Heather's card was Awesome....Mine is half copied so I will call it half-ass good!

Thanks for taking the time to read all the way down to here!


Friday, March 21, 2008

Easter Cont'd

Okay! Here are the other Easter Cards that I promised ya! As you can see by these cards, once I get a sketch that I like…..I like to recreate it until I’m sick of it! I am not very good at sitting down and making 10 different cards but I am pretty good at making 10 of one sketch with a few tweaks! I just LOVED these colors. I used to think I was not a fan of yellow or orange, but SU! has introduced me to some great yellows and oranges and I find myself reaching for them more often now! I even painted my bathroom something similar to Barely Banana and So Safron…with a touch of Apricot Appeal! I had pieces of the cardstock stuck on the wall for weeks so I could see which I liked best, then I picked one and went to town painting it and I LOVE it! Okay, back to those cards!

First off, I have to tell you about the stamp set I used for this one! Sweet Tweets (not to be confused with Sweet Teats, which I’ve caught myself saying many times on accident), it is a retired set from TAC and I think these chicks are just so cute! I love their long legs and the simplicity of each image! All of the following cards are basically the same layout on a 4-1/4 square card. On the first two cards, I used PTI Stamper’s Select White Cardstock. After using this paper, I won’t settle for any other white cardstock as a base of a card! Cuttlebug and Nestabilities make it this sketch so easy! I used the Swiss Dot and Petite Ovals. It goes together easy-peasy! I colored the images with Prismacolor Double-ended Art Markers. I almost forgot to mention that I did sneak PTI Limitless Labels in there for the “Happy Easter!” I only used the sentiment on one card because I wanted these to also be good for spring cards, baby cards, or any-occasion cards.


On the next two cards, I used the Spring DCWV stack from last year, Nestabilities scalloped rectangles and ovals, and the Cuttlebug embossing folders. I apparently didn’t use Swiss Dot for every card! The one on the left is Swiss Dot just turned with the dots facing down and the “holes” facing up. I liked how it gave a softer look. The one on the right, however, was created with the Paisley embossing folder! These are still basically the same layout as above, just one more added layer….still easy-peasy! I also added a little pink bling for flowers!


And the final two cards, well they are just the same, no surprise, but I did use a different stamp set, oh! And it looks like I used a different embossing folder!! This stamp set is called “Be Curious” and it is also a retired TAC set! Unfortunately, they retired a lot of good ones! These flowers are just so cute to me and make me smile! Just in case you are wondering, I use a Big Shot to do my die cutting and embossing. I have been very satisfied with it for over a year. It is compatible with just about everything out there, and I think I get a great result!


Okay, one last thing! For an added bonus, I thought you might like to see my stinkin Easter baskets!

I had some white treat boxes that I cut the handles off of, I used my Creative Memories custom cutting system, ovals, to create the "egg", and to cut the handle out, and then I glued it to the box. I added a bit of embellishments and layers and this is what I got! I have seen some other baskets like this before at Splitcoast Stampers, but I do not know the original gallery or creator. Stampin UP! Pun Fun is the stamp set that I used. This set is a bit on the pricey side, but so far, I've used it to make plenty of Easter stuff, and a Birthday card for my sister. I mounted the set "unconventionally" by cutting of the phrases and mounting those on the side of the block that way I don't have to use the words if I choose not to, or worry about masking them off.


Thanks for checking out my stuff! Hopefully I will get a chance to create something new this weekend to share with you!

LinkWithin

Blog Widget by LinkWithin